Vegetarian

Slow Roasted Cabbage with Miso Yoghurt Dressing

IMG_2260.jpg

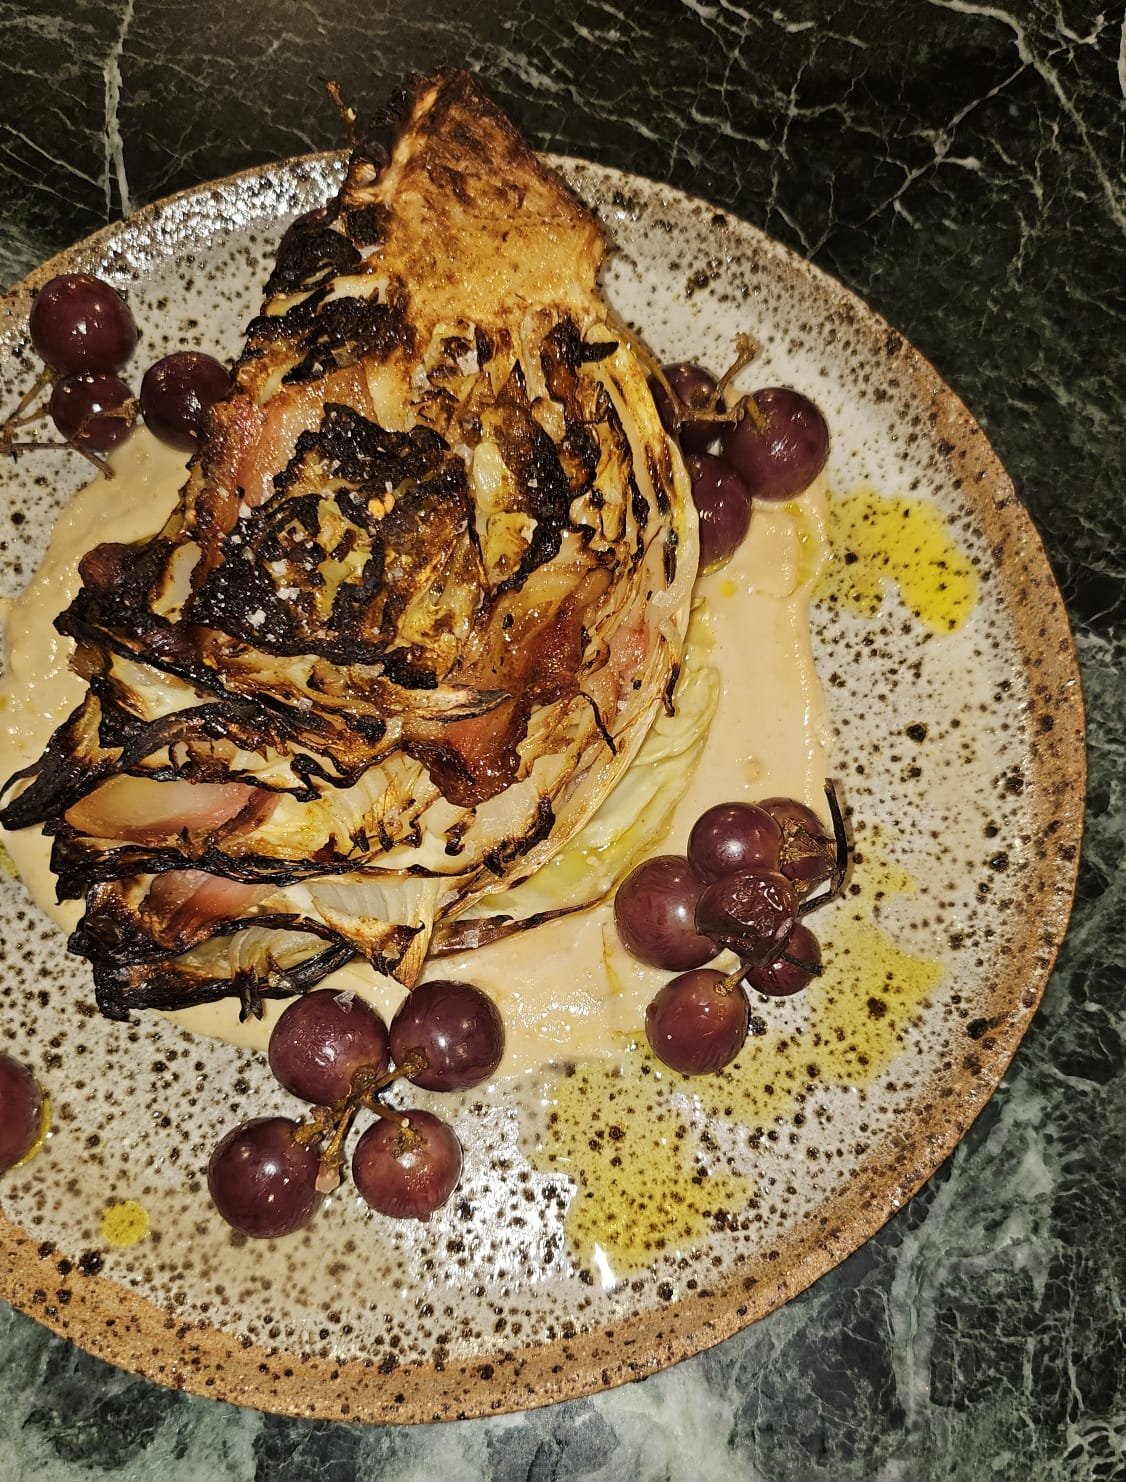
If you’re after a vegetarian side with a bit of heft, this is a great one to add to your arsenal. The cooking process adds a meatiness to the texture of the dish making it feel substantial and earthy, while the finish gives the outer leaves a nuttiness, and a satisfying caramelised crunch.

Ingredients

1 head cabbage (I used Savoy), outer leaves removed and thoroughly washed

1 knob butter

To finish

1 knob melted butter

25ml sherry vinegar (or a vinegar of your choosing)

1 cup Greek yoghurt

White miso

Togarashi or furikake, to garnish (you can also top it with chopped nuts, herbs or a chimmichurri

Method

Preheat the oven to 140c. Using a small paring knife, careful cut some of the core from the cabbage, around the size of a golfball. The purpose of creating a small space in the base, is so that the cabbage can take in the steam and cook properly.

Find an oven friendly pot/baking vessel with a lid that fits the cabbage snugly, and place the cabbage in. Fill with water to halfway, top with the knob of butter, cover with baking paper and the lid. Place the cabbage in the oven for 4 hours on 140c.

Remove the cabbage from the oven and drain the water out completely. Turn the oven up too 200c. Combine the melted butter and vinegar (about equal parts) in a small bowl and brush the mixture over the top of the cabbage. Pour over any excess and place the cabbage back in the oven, uncovered, until crisp and bronzed.

To serve, combine the yoghurt with white miso, to taste. Miso yoghurt is a total game changer: it adds a supreme savoury quality to any dish you add it to, try using it as a salad dressing, or finishing roast veggies with a dollop of this white gold!

Spread the miso yoghurt on the base of a serving dish. Carve the cabbage into wedges, place on top and garnish with furkiake, or any garnish of your choosing.

Kuku Sabzi - Persian Green Omelette

Kuku Sabzi.JPG

This verdant Persian omelette is more veg than egg, and it should absolutely make it into your mid week dinner or weekend brunch repertoire. What I love about this dish and Middle Eastern cooking in general is its incredible combination of heady spice, generous textures and a beautiful balance of sweet, bitter, fresh and rich. The deeply savoury flavours are studded by pops of tart sweetness from the barberries, and the radicchio adds a bitter edge of depth and dimension to round out the herbaceous flavours.

There are many ways to make this recipe your own, and this one is by no means the most authentic recipe you’ll find, but that’s the beauty of trying it out and tweaking it over time. The eggs in this dish are just there to set the herbs and vegetables, so it’s a great one for those who don’t like the egginess of a classic frittata.

Ingredients

1 large brown onion, peeled and chopped

3 cloves garlic, finely chopped

1 bulb fennel, coarsely chopped

1 big handful of radicchio, thinly sliced (for a less bitter edge, you could also use kale or silverbeet)

For the egg mixture

7 large eggs

1 cup flat leaf parsley, leaves picked and chopped

1 cup dill, chopped

1 cup coriander leaves, chopped

1 tbsp ground turmeric

1 tsp ground black pepper

1/2 tsp cinnamon

1 handful barberries or raisins

Butter

Oil

Salt flakes

To garnish

Chopped tomatoes, flat leaf parsley, sumac, yoghurt, lemon, sesame seeds

Method

In a heavy based frying pan on a medium heat, add a good slug of vegetable oil and the onion, garlic, fennel and radicchio. Sweat for 10-15 minutes until cooked through, glossy and beginning to caramelise. Remove the vegetables from the pan and transfer to a bowl to cool a fair bit (too hot, and the eggs will start to cook before you want the to). Once cooled, drain any excess liquid from the vegetables.

In a blender, add the eggs, parsley, dill and coriander with a good pinch of salt. Blitz into a verdant green smoothie-looking mixture.

Into the cooled and drained vegetables, add the turmeric, pepper and cinnamon and combine thoroughly. Gently fold in the egg mixture, along with the barberries.

In a deep non stick pan with about a 23cm diameter on medium heat, add a large knob of butter and good slug of vegetable oil and melt. Swirl to coat the pan (including the sides), and once the butter is bubbling. You can test whether the oil is hot enough by adding a teaspoon of the mixture in. If it sizzles, you’re good to go. Pour in the egg mixture and tap the pan gently to remove any air bubbles.

Reduce the heat to medium/low and allow the mixture to set. When you can see a crust forming around the sides, gently edge a knife around the sides to release it from the pan, so it can continue to crisp up and form a shell on the outside. Cook for a further 15-20 minutes, or until set.

If you’re feeling confident, pop a plate over the top of the pan and flip out your omelette (be careful, as the hot oil will drip out), then gently slide it back into the pan to seal the other side briefly. Otherwise, if you’re not ready to try this out, you can pop the pan into the oven at 180c to set the top. Remove when it has a stiff jiggle going on.

Serve, turned out on a plate and garnish with yoghurt (or labne), a pinch of sumac and sesame, and some chopped tomatoes and parsley, dressed in olive oil, lemon and a good pinch of salt.

Pistachio green sauce

Pistachio Green Sauce.jpg

Cool weather means rich, low and slow cooking. A favourite at our place is a classic Italian-style pork shoulder, poached in spice-infused milk. But whether it’s meat or veg, rich food needs a little lightness and acidity. This pistachio and herb sauce is a cinch to make, and can be used to bring balance to a slow roast chook, pork, veg…easy does it!

This recipe was inspired by my super overgrown amounts of parsley and mint in the garden right now. They’re fed by the compost we make from our vegetable trimmings in the kitchen. Full circle stuff is satisfying, and achievable, even in small spaces.

Ingredients

1 cup shelled pistachios, toasted and chopped (you could also try it with other nuts, like hazelnuts, walnuts or almonds)

2 handfuls parsley, leaves picked and finely chopped (I used one each of curly and flat leaf)**

1 handful mint, leaves picked and finely chopped

1 lemon, zested

1 cup olive oil

2-3 tablespoons hot sauce (to taste)

salt and pepper to season

Method

In a bowl, combine the toasted, chopped pistachios, finely chopped herbs and lemon zest. Juice the lemon and pour over the herbs, then toss to combine. Add the olive oil gradually, while stirring, until everything is combined and generously coated. Add hot sauce, salt and pepper to taste, adjusting for acidity and balance. This is one of those recipes that relies on adjusting to your preference, rather than adhering to the rules. Lemons yield more or less juice, your olive oil may be fruitier or more neutral… so just taste and adjust as you go. Set aside from an hour or two before serving, to allow the acid to break down the herbs and the flavours to develop. Serve with your favourite roasted or slow cooked meat or veg.

Notes: if you wanted to go fancy lazy, you could add this all to a blender and make a smooth sauce. Add capers and toasted fennel seeds if serving with a whole roasted fish… treat this as a basic recipe you can own.

**make sure you compost your green offcuts responsibly! The herbs I used were from my garden, which is nourished by the compost I make from my veggie scraps.

Silverbeet with Chickpea, Chilli & Lemon

Silverbeet with chickpea and lemon.jpg

You want quick, simple, cheap and healthy? You’ve come to the right place. This is a regular mid week favourite and a classic from Joe’s family, amended slightly to maximum yum. It’s also vegan and gluten friendly as well.

Ingredients

1 large eschallot (or a small brown onion), peeled and finely sliced⁣⁣⁣
2-3 cloves garlic, peeled and smashed⁣⁣⁣
2-3 bird’s eye chilis, finely sliced⁣⁣⁣
1 bunch silverbeet, stems chopped finely, leaves more roughly⁣⁣⁣
1 tin chickpeas, drained and rinsed⁣⁣⁣
1 lemon, zested and juiced⁣⁣⁣
2 tbsp olive oil⁣⁣⁣
Salt flakes⁣⁣⁣
Black pepper⁣⁣⁣
Pinch freshly grated nutmeg or cinnamon (optional)⁣⁣⁣

Method
In a large pan or pot on a moderate heat, add about a tbsp of the olive oil and sauté the eschallot, garlic and chilli for 1-2 minutes, or until the eschallot is translucent. Add the finely chopped stalks and cook for a further 3-4 minutes, or until slightly softened. Add the chopped silverbeet leaves and give everything a good stir to combine and then wait for the leaves to wilt and cook down. Add the chickpeas, combine well. Once the leaves are cooked down to your liking (you may want to keep it a bit fresh and crunchy, or stew until really tender; cook’s choice), remove the pan from heat and add the lemon juice and most of the zest (reserve some for garnish). Combine well and season with salt and freshly cracked black pepper to taste. You can also grate a little nutmeg or cinnamon (or both!), to amp up the dimension, if you have it. ⁣⁣⁣
⁣⁣⁣
To serve, place the silverbeet onto a bowl, dress with olive oil, salt flakes and remaining lemon zest.⁣ Great as a stand-alone dish, but just as ideal as part of a bigger dining picture. For the train spotters, that is indeed a lime prop, but in all honesty, you could use that instead of lemon and be fine.

Carrot and Miso Soup

Pumpkin MIso Soup Melissa Leong Fooderati

A super easy, turbo-charged veggie soup to add to your repertoire. Simply switch out the chicken stock for vegetable stock and the butter for olive oil for a hearty, healthy, vegan staple.

Ingredients

3 tablespoons vegetable oil 

3 cloves of garlic, peeled and finely chopped

2 brown onions, peeled and coarsely chopped

1 teaspoon sea salt 

1 teaspoon ground white pepper 

2 tablespoons white miso paste

10 carrots, peeled, topped, tailed and cut into chunks

Enough rich chicken or vegetable stock to cover solids (about 1.5L)

50g butter (substitute with olive oil to make this vegan)

2 tablespoons good quality EVO (I love Alto Olives)

Method

In a large saucepan, heat the 3 tablespoons of oil over low heat. Add the garlic, onion, salt, pepper, and, stir to combine and bring the heat up to medium. Sauté until the onions are translucent, but haven't taken on colour. Add the carrots and cook for a further 5 minutes. Add in the miso paste and then pour in enough stock to cover the vegetables. Bring to a simmer, then cover and cook until the vegetables collapse under the pressure of a spoon. Carefully remove the pot from the stove, add the butter and then and using a stick blender, blitz until smooth. Taste to season and serve with a drizzle of green herb oil, yoghurt and fried garlic crumbs.


A Vegan Chinese Hot Pot

IMG_9588.jpg

Ok, so by now we all know that even the most dedicated of meat eaters should probably eat a few more vegetables...not only for health, but also for sustainability of agriculture. That aside, they're bloody delicious when treated with a little love. Here's probably the simplest recipe I've ever posted, it's a Chinese-style hot pot that's full of flavour, texture and is super good for you as well, lots of protein, healthy carbohydrates and good fats to keep you full. 

Serves 1 hungry person or 2 as part of a meal

Ingredients

1/2 small brown onion, finely sliced

1/4 large sweet potato, washed and chopped into 1 inch cubes*

1 heaped tablespoon, mushroom XO sauce (from the Asian grocery aisle at most supermarkets)

100g firm tofu, chopped into 1 inch cubes (about a third of a packet, as a guide)

1/2 cup vegetable stock

1 handful fresh green or butter beans, trimmed

2 tablespoons pickled mushrooms (optional)

1-2 sprigs green peppercorns (you could use a teaspoon of dried Sichuan peppercorns instead)

Method

Preheat an oven to 200c. In a heavy based frying pan on a medium heat, add a tablespoon of vegetable oil with the onions and stir fry for 1-2 minutes until translucent. Throw in the sweet potato and turn up the heat to lightly brown the edges of the sweet potato for 2-3 minutes. Add the XO and turn down the heat, coating everything evenly. Throw in the tofu and gently stir to combine. Add a pinch of salt flakes and the stock and bring the hot pot to a simmer. Add the beans, pickled mushrooms and peppercorns, stir briefly to combine season, to taste.

Pour the hot pot into a small cast iron dish or any heavy casserole pot that 'just' fits the ingredients (you don't want a heap of space, because you want the liquid to bubble, not evaporate completely). If it's looking a little dry, top with more stock but do not cover completely. Bake for 15-20 minutes or until the top is crispy and golden and the liquid has reduced to a sauce consistency. Carefully remove and set aside until cool enough to serve. Serve with brown rice, noodles or a super fresh cabbage salad.  

*Basically, you want everything to be roughly the same size so everything cooks evenly. Bite-sized pieces are roughly what you want to go for!

Simple Spiced Carrot & Pumpkin Soup

Spiced Carrot and Pumpkin Soup.jpg

In life, quick and easy rarely equates to good, but in this case, that rule doesn't apply. As the weather mercifully cools, it's time to add to your soup arsenal...and this warming and aromatic spiced carrot and pumpkin soup is a great one to add to your hit list. 

Ingredients

3 tablespoons vegetable oil 

2 tablespoons coriander seed

3 cloves of garlic, peeled and finely chopped

2 brown onions, peeled and coarsely chopped

1 teaspoon sea salt 

1 teaspoon ground white pepper 

1 tablespoon brown sugar 

1 teaspoon five spice powder

10 carrots, unpeeled, tops removed, cut into chunks

1/2 Jap pumpkin, skin and seeds removed, cut into chunks

Enough rich chicken or vegetable stock to cover solids (about 1.5L)

50g butter 

2 tablespoons good quality EVO (I love Alto Olives)

Method

In a large saucepan, heat the 3 tablespoons of oil over low heat, then add the coriander seeds and toast until aromatic. Add the garlic, onion, salt, pepper, sugar and five spice, stir to combine and bring the heat up to medium. Sauté until the onions are translucent, but haven't taken on colour. Add the carrot and pumpkin, and cook for a further 5 minutes. Pour in enough stock to cover the vegetables and bring to a simmer. Cover and cook until the vegetables collapse under the pressure of a spoon. Carefully remove the pot from the stove and using a stick blender, blitz until smooth. Taste to season and serve with a drizzle of olive oil. 


4 Ingredient No Bake Coconut Crack Bars

As seen on Everyday Gourmet with Justine Schofield and Melissa Leong

As seen on Everyday Gourmet with Justine Schofield and Melissa Leong

A new year rolls around, as does the guilt for potentially overdoing it between Christmas and New Years, even though it's probably worth the argument that it's really what you eat between New Years and Christmas that's more important. 

But anyway, I digress. Once the sugar high from all your favourite end of year desserts comes to an end (personally, I'm a pavlova and trifle girl), here's a slightly more virtuous afternoon tea accompaniment that's vegan as well as gluten, refined sugar and dairy free...but be warned, they are called Crack Bars for a reason. There is zero baking involved and the base recipe is just 4 ingredients (I don't count salt), which you can add your favourite toppings or ingredients like pepitas and raw chocolate (pictured), cacao nibs, dried fruit, etc. Enjoy! 

Ingredients

1 cup dessicated coconut

1/4 cup maple syrup (honey will work, but isn't vegan if that matters)

2 tbsp coconut oil, melted

1/2 tsp vanilla extract

1 pinch sea salt

Optional: a handful of pepitas, raw chocolate to drizzle. 

Method

Place the dessicated coconut into a mixing bowl. In a separate bowl, combine the melted coconut oil, maple syrup and vanilla extract. Add the wet ingredients to the dessicated coconut, along with a good pinch of sea salt and combine well. At this stage, you can add any additional  ingredients you like, for example, a handful of chopped nuts, cacao nibs, pepitas, or dried fruit.

Line a shallow baking tray with baking paper and press the mixture into a level rectangle shape, alternatively you can use silicon ice cube moulds. Freeze the pressed mixture for 10-20 minutes until set, then slice into portions, or pop out of the mould, if using. If you want to drizzle a little melted chocolate (raw or otherwise, I don't discriminate), this is when you'd do that (and let's be honest, when is a little extra chocolate a bad idea?).

Store refrigerated. 


Vegan Chocolate Mousse

Vegan Chocolate Mousse.jpg

Instagram is a wonderful thing for inspiration. It's also terrible for creating unrealistic expectations about everything from diet to body image, but that's a conversation for another time. A dear friend and chef Sharon Salloum from Sydney's Almond Bar (if you haven't been, you really should) recently posted a vegan chocolate mousse she had made. Being a chef and then running into health issues is never ideal, but it happens more than you think. Having to change what we eat out of necessity does create an opportunity to explore new things however, and while I could never EVER be vegan, that isn't to say that recipes that don't involve animal products can't be delicious. Case in point, this extremely rich and velvety chocolate mousse. Chances are you already have most of these ingredients at home anyway, so why no, eh?

Serves 2

Ingredients

1 ripe avocado

1/2 frozen banana

2 tbs cacao powder

1 tbs vanilla protein powder (I used Tropeaka Lean Protein, but this isn't a sponsored post)

1 tsp maple syrup or rice malt syrup (you could use raw honey for a vegetarian option if you don't want to go fully fledged vegan)

1 pinch sea salt

1 tbs coconut yoghurt or almond milk (optional, if the ingredients get a bit too thick to blend)

Cacao nibs and other fun things, for garnish

Method

Throw all your mousse ingredients into a high speed blender. Blitz until smooth (here's a recipe where 'rustic' chunks of avo probably aren't so appealing). The frozen banana means the mousse is pretty much ready to eat out of the blender, but I recommend decanting it into a bowl and chilling it in the refrigerator for about 20 minutes or until ready to eat. Garnish with your favourite toppings and a little extra pinch of sea salt. 


Pasta-free Lasagne with XO

Pasta free lasagne

My Italian mother-in-law would probably have a heart attack for calling something 'lasagne' that contains no pasta, but seeing as my husband made this particular recipe with me, we'll let it slide. We decided to replace the pasta sheets with layers of eggplant and zucchini on account of coming home from the Australian Financial Review Top 100 Restaurant Awards in Sydney after an epic 4 days of eating everything in sight (we went to Sokyo, Billy Kwong, Icebergs, The Dolphin, Hubert, Hubert again, Fratelli Paradiso, Automata, Ester and Din Tai Fung, just so you get the picture) and wanted to eat healthier without feeling like we were missing out on life.  Everything else about this dish is legit though, including the very handy Italian mama kitchen tip of using leftover charcuterie bits and pieces to add depth of flavour to sauces and stews (we used njduia). Add to that the not-very-Italian-mama tip of adding a little XO into sauces that aren't necessarily of Asian influence, and you have one rich, complex sauce that works well on pretty much anything. 

Ingredients

Red sauce

1 leek, washed and finely sliced

3 brown onions, peeled and finely sliced

2-3 cloves garlic, peeled and finely sliced

50g njduia (or any leftover pieces of salami, pancetta or bacon fat, finely chopped)

1/2 bottle of red wine

2 tins crushed tomatoes

1 strong tablespoon of XO paste

Salt &  pepper.


The rest

1 large eggplant, mandolined lengthways into 5mm sheets

2 large zucchinis, mandolined lengthways into 5mm sheets

200g fresh ricotta

1 handful parsley leaves, finely chopped

1 fennel bulb, sliced

Sea salt flakes

Freshly cracked black pepper

Olive oil

Method

Preheat an oven to 180c. For the red sauce, heat a large saucepan on a low to medium heat, then add a good slug of olive oil. Add the leeks, onion and garlic and cook until softened but the vegetables haven't taken on any colour. Take this opportunity to season the base. Add in the njduia (or chosen salumi) to the pan, burying it amongst the vegetables. It'll begin to break down and render the fat out. Once this happens, mix everything vigorously to combine. After another 2-3 minutes, add the wine. Cook over medium high heat until reduced by two thirds and the mixture is glossy and thick. Add the tinned tomatoes and stir to combine. Once boiling, reduce the heat and simmer the sauce until reduced by about half and starts to take on a thick spoon-coating texture. Season with salt, pepper and XO to taste (this gives the sauce an umami punch and an extra dimension of flavour), then remove from heat and carefully transfer to a heatproof blender. Alternatively, you can use an immersion blender on it's highest setting. Blitz the mixture on high into a smooth puree, then set aside to cool slightly. 

Meanwhile, prepare the ricotta filling by combining the ricotta with the chopped parsley in a bowl, mixing well. If the mixture is too thick, add a little olive oil to the mix. Season well with salt and pepper, then set aside. 

Line a baking dish with baking paper. Spread a few spoonfuls of the red sauce into the dish, then top with a layer of eggplant. Top with an even layer of ricotta, then more red sauce, then a layer of zucchini. Continue to alternate layers of eggplant, red sauce, ricotta, and zucchini, finishing with ricotta on top. Lay the fennel slices on top and cover with a layer of baking paper. Transfer the dish to the oven and bake for 30 minutes. Remove the baking paper, turn the oven up to 200c and continue to cook for a further 20-30 minutes or until the top is golden and bubbly. 

Remove the lasagne from the oven and allow to cool and set before slicing, otherwise the whole thing will collapse. Serve the lasagne topped with Parmesan or pecorino, microplaned over the top, and a few basil leaves.