Easy Recipes

Guanciale stuffed cabbage with roasted grapes and cashew cream

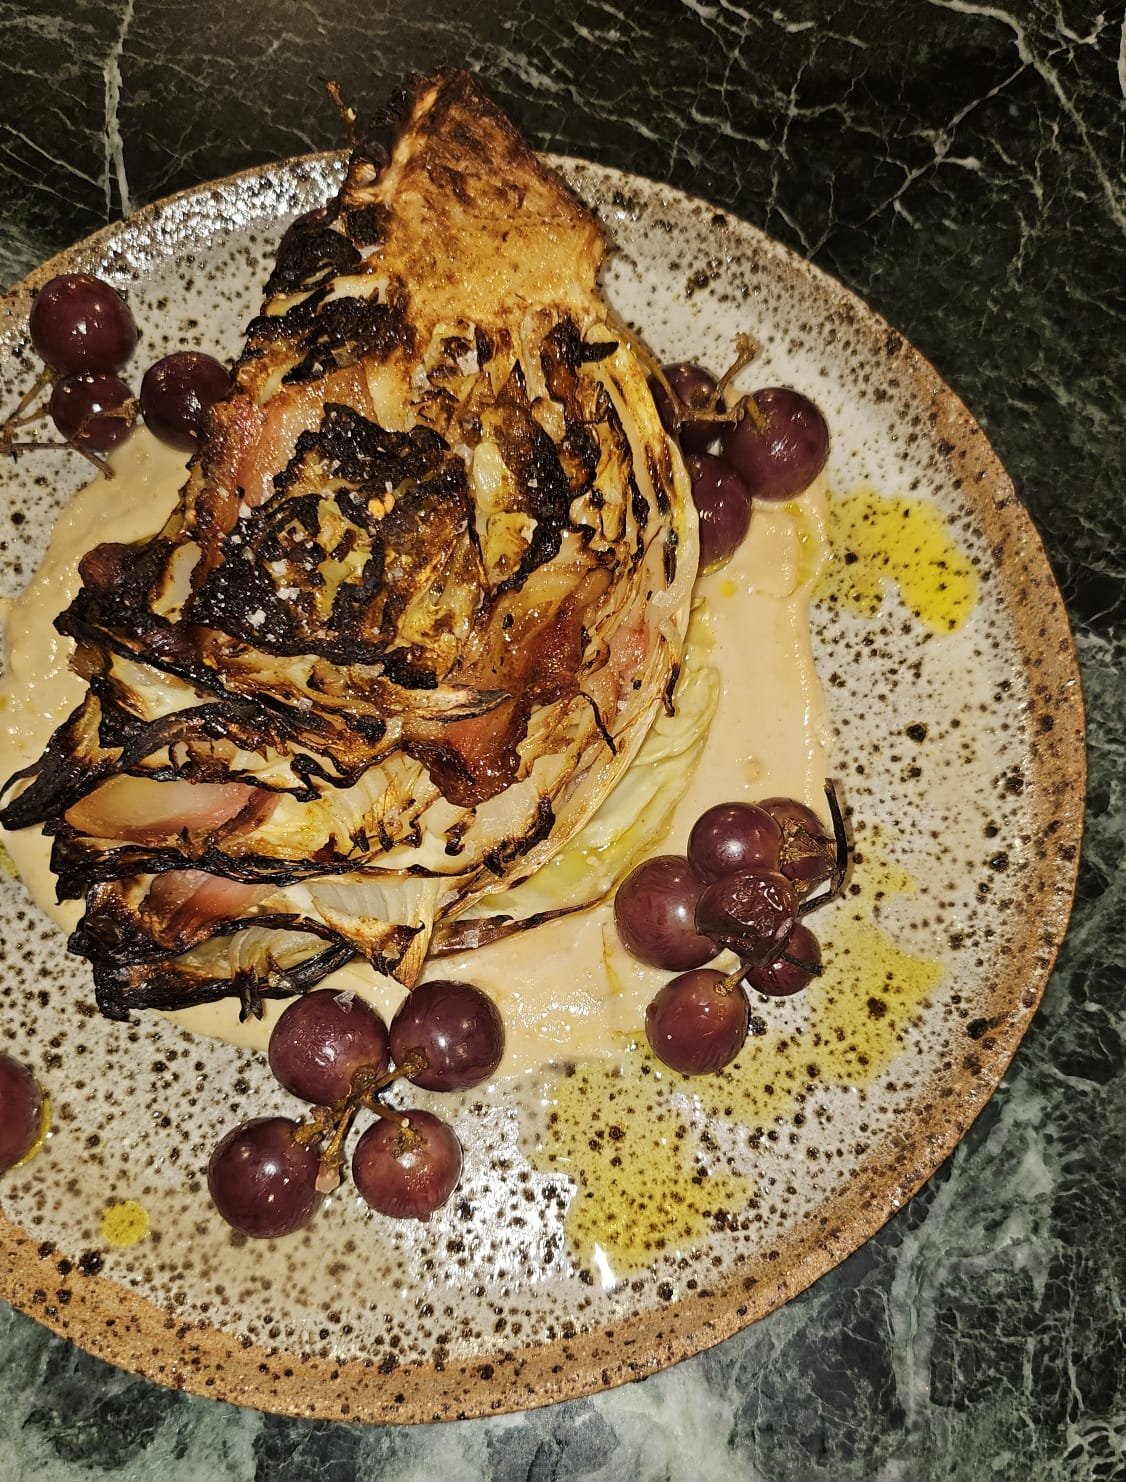
When fridge clean outs go right, you get guanciale stuffed cabbage with roasted grapes and cashew cream.

This recipe is a more a “recipe”. That is, a loose list of suggestions that you can adjust based on what you may have in your fridge or cupboard… don’t feel completely wed to what I’ve used, the whole point is to use what you have. If your cabbage is a different variety. If you’re pescatarian and you’d prefer to use tinned achovies instead of guanciale. If you have almonds or pistachios instead of cashews. Just taste, adjust and you’ll figure it out!

The elements that make this dish work are:

  • Charring the leaves. It adds depth of flavour, texture and a slight smokiness.

  • Guanciale adds salt, fat and body to the end result.

  • Chicken stock helps to steam and soften the leave, speeding up the cooking process. Water will totally suffice.

  • Grapes add acidity, a sweet and sour punch. You could sub that element out with adding pickles to the final dish… I’m thinking pickled red onion.

  • The cashew cream adds a saucy element to bring it all together. A slick of Greek yoghurt, seasoned with salt, perhaps spiked with preserved lemon would also work beautifully.

Ingredients

A wedge of drumhead cabbage

50g guanciale, sliced

1/4 brown onion, sliced

1 small bunch grapes

1 cup chicken stock

Cashew cream

1/2 cup dry roasted cashews

1/4 cup water

2 tbs olive oil

1 tbs white miso

Lemon juice

salt flakes

Method
Preheat an oven to 210c. Heat a cast iron or heavy based pan on high. Once hot, add oil and char the cut edges of the cabbage. Set aside.

When cool enough to handle, gently tuck slices of guanciale and onion between the leaves of the cabbage. You could add soft herbs, garlic, anchovies, the aim of the aim is to add flavour and fat… how you go about that is up to you!

Transfer to a baking tray, pour over the chicken stock and add the bunch of grapes. Roast until the inner leaves become tender, about 45mins, turning the heat down to 190c at 30mins.

Blitz the ingredients for the cashew cream and season to taste. Add more water if the cream is too thick, more cashews if you’ve overdone it.
To serve, slick the cashew cream on a plate, gently place the wedge on top and dress with a generous drizzle of olive oil, salt and lemon juice.


Silverbeet with Chickpea, Chilli & Lemon

Silverbeet with chickpea and lemon.jpg

You want quick, simple, cheap and healthy? You’ve come to the right place. This is a regular mid week favourite and a classic from Joe’s family, amended slightly to maximum yum. It’s also vegan and gluten friendly as well.

Ingredients

1 large eschallot (or a small brown onion), peeled and finely sliced⁣⁣⁣
2-3 cloves garlic, peeled and smashed⁣⁣⁣
2-3 bird’s eye chilis, finely sliced⁣⁣⁣
1 bunch silverbeet, stems chopped finely, leaves more roughly⁣⁣⁣
1 tin chickpeas, drained and rinsed⁣⁣⁣
1 lemon, zested and juiced⁣⁣⁣
2 tbsp olive oil⁣⁣⁣
Salt flakes⁣⁣⁣
Black pepper⁣⁣⁣
Pinch freshly grated nutmeg or cinnamon (optional)⁣⁣⁣

Method
In a large pan or pot on a moderate heat, add about a tbsp of the olive oil and sauté the eschallot, garlic and chilli for 1-2 minutes, or until the eschallot is translucent. Add the finely chopped stalks and cook for a further 3-4 minutes, or until slightly softened. Add the chopped silverbeet leaves and give everything a good stir to combine and then wait for the leaves to wilt and cook down. Add the chickpeas, combine well. Once the leaves are cooked down to your liking (you may want to keep it a bit fresh and crunchy, or stew until really tender; cook’s choice), remove the pan from heat and add the lemon juice and most of the zest (reserve some for garnish). Combine well and season with salt and freshly cracked black pepper to taste. You can also grate a little nutmeg or cinnamon (or both!), to amp up the dimension, if you have it. ⁣⁣⁣
⁣⁣⁣
To serve, place the silverbeet onto a bowl, dress with olive oil, salt flakes and remaining lemon zest.⁣ Great as a stand-alone dish, but just as ideal as part of a bigger dining picture. For the train spotters, that is indeed a lime prop, but in all honesty, you could use that instead of lemon and be fine.

Ù Tridd: The Pasta From Puglia You Need To Know

Ù Tridd Puglia Pasta

My mother Vincenza is a bit of a legend. She cooks food that seems so simple, yet is layered and nuanced and cooked with so much soul. This is a recipe from her mother Rose, it’s called ù tridd. It’s essentially a hand torn southern style pasta, laced with fresh parsley; similar to stracci (which literally translates into ‘rags’ or ‘tatters’).

Of course, you can swap out the water for stock or add garlic and more herbs to add another dimension of flavour, but then again, why mess with an OG Italian Nonna recipe? The origins of this recipe are from the Tatolli family’s town of Molfetta, which is part of the Puglia region of Southern Italy. As such, this recipe is rooted in humble ingredients; you won’t find rich butter, cream, truffles or other luxury ingredients here. Clean and simple, this is a case study in soul food.

Ingredients

The pasta

3 cups fine semolina

3 cups Tipo 00 pasta flour (plain flour will suffice if needed)

4 eggs

1 handful continental parsley leaves, finely chopped

1 - 1 1/4 cups lukewarm water (as needed)

Extra flour to roll out

The broth

2 veal shins (you can also use lamb shanks or beef ossobuco)

2 carrots, peeled and roughly chopped

2 celery stalks, peeled and roughly chopped

1 large brown onion, peeled and quartered

1 few sprigs of fresh parsley

500ml tomato sugo

Salt and pepper to taste

Finely grated Parmigiano Reggiano, to serve

Method

For the pasta, in the bowl of a stand mixer with a dough hook attachment, add the semolina, flour and eggs and turn the mixer on a low setting. When combined, add the parsley and continue to mix until combined. Gradually add water until the dough comes together. Continue mixing until the dough is no longer sticky and has become soft and pliable. Turn the dough out onto a clean, lightly floured surface and roll the dough into a log roughly 50cm long and 20cm wide. Cut sections around 3cm and pass them through a pasta roller several times so that the dough is smooth and uniform in thickness (around setting 3-4). Set aside to dry for at least 2 hours on wooden dowels… a clothes drying rack will also suffice! Once dry, tear the pasta sheets unto small pieces around the size of your pinky thumbprint. The beauty of this dish is that you don’t have to be too careful, just make sure the pieces are roughly the same size. Set aside to continue to dry out until ready to use. This pasta can be completely dried out and stored for later use.

For the broth, bring a heavy based saucepan or pot to a medium high heat and add a good slug of olive oil. When the pan is hot, sear the shanks until lightly browned on all sides. Throw in the carrots, celery and onion and parsley and stir to combine. Cook for about 3-4 minutes until the onion starts to go translucent. Pour in the sugo and then top with enough water to cover the shanks. Bring to the boil, season liberally with salt and freshly ground black pepper, then reduce to a low heat, cover and simmer for 90 minutes. Skim any fat if necessary. Season again to taste at the end. When the shanks are falling apart, strain the liquid from the solids. Reserve the meat, lightly shred, then set aside.

To serve, bring a pot of salted water to the boil. Once boiling, throw in a good handful of the pasta per person and cook for 4-5 minutes or until tender. Strain and refresh in cold water. In a separate pot, bring the deliciously meaty tomato broth to the boil. Add the cooked pasta and the shredded meat. Season to taste, then serve immediately, topped with finely grated Parmigiano Reggiano, or any sharp, hard Italian cheese, some freshly cracked black pepper and chopped parsley, if desired.


Tom Yum Sausage Rolls

Adding a Thai twist to one of Australia’s favourite meaty pastries, lemongrass and ginger add zing, while the shrimp paste and coriander adds to that savour flavour we all love. Best of all, you already know this recipe…just add (tom) YUM!

Makes: About 16 rolls 

Preparation time: 15 minutes

Cooking time: 25 minutes

Chilling/freezing time: 20 minutes

Level of difficulty: easy

Ingredients

 500 g pork and veal mince

2 tbsp tom yum paste

1 small carrot, peeled and finely chopped

1 brown onion, peeled and finely chopped

1 stick celery, finely chopped

1 clove garlic, minced

1 tbsp potato starch

½ tsp ground white pepper

2 sheets frozen puff pastry, partially thawed

1 egg

Nuoc cham (or if you’re feeling super Aussie, sweet chilli) sauce, to serve

Method

In a large mixing bowl, combine the mince, tom yum paste, carrot, onion, celery, garlic, potato starch and white pepper and mix well with clean hands to combine until everything is emulsified. Throwing the mixture vigorously against the side of the bowl or on a clean bench top will help. Work quickly, keeping the mixture as cool as possible, then cover and refrigerate until needed. When you are ready to assemble, place a sheet of thawed puff pastry onto a clean surface and cut in half, lengthways.

Remove the sausage mixture from the fridge and roll a log about 2.5cm in thickness and place it lengthways onto the pastry, closer to one edge. Carefully roll the pastry, making sure the filling is snug to the pastry with no gaps, and seal the edge where the pastry meets with egg yolk. Set aside in freezer to allow the mixture to firm up.

Repeat until you have used all of the filling. When ready to cook, preheat the oven to 200˚C. Remove the sausage roll logs from the freezer and allow them to thaw slightly. Cut into desired size, brush with remaining egg yolk and place on a baking tray lined with baking paper.

Bake for 20 minutes or until the pastry is golden. Set aside to cool slightly, then watch them disappear!

Note

Tom yum paste can be found in the Asian aisle of most major supermarkets and Asian grocery stores. Because the paste is very salty, there’s no real need to season with additional salt. These sausage rolls work really from frozen to the oven, so make a batch ahead of time and just pop them in the oven when unexpected hungry visitors come calling.